搞点哦润吉吃吃🍊
本题考查基本的 Web 自动化脚本编写。
INFO
本来是想通过社会工程学密码生成器生成弱密码爆破登录,但是觉得有点偏题了,干脆直奔考点吧整体其实就是 Python 脚本的编写,如果部分同学有爬虫的基础,那这道题只能是轻轻又松松建议提前了解知识点:HTTP 协议包括请求及响应基本格式内容(Week1 中你们已经学习)、Python 的基本语法和 requests 库基本用法、正则表达式模块当然如果你喜欢用别的代码语言或模块,请随意
收集信息
F12 查看提示
<!-- 唔...这个密码有点难记,但是我已经记好了 Doro/Doro_nJlPVs_@123 -->登录后,让我们计算 token。
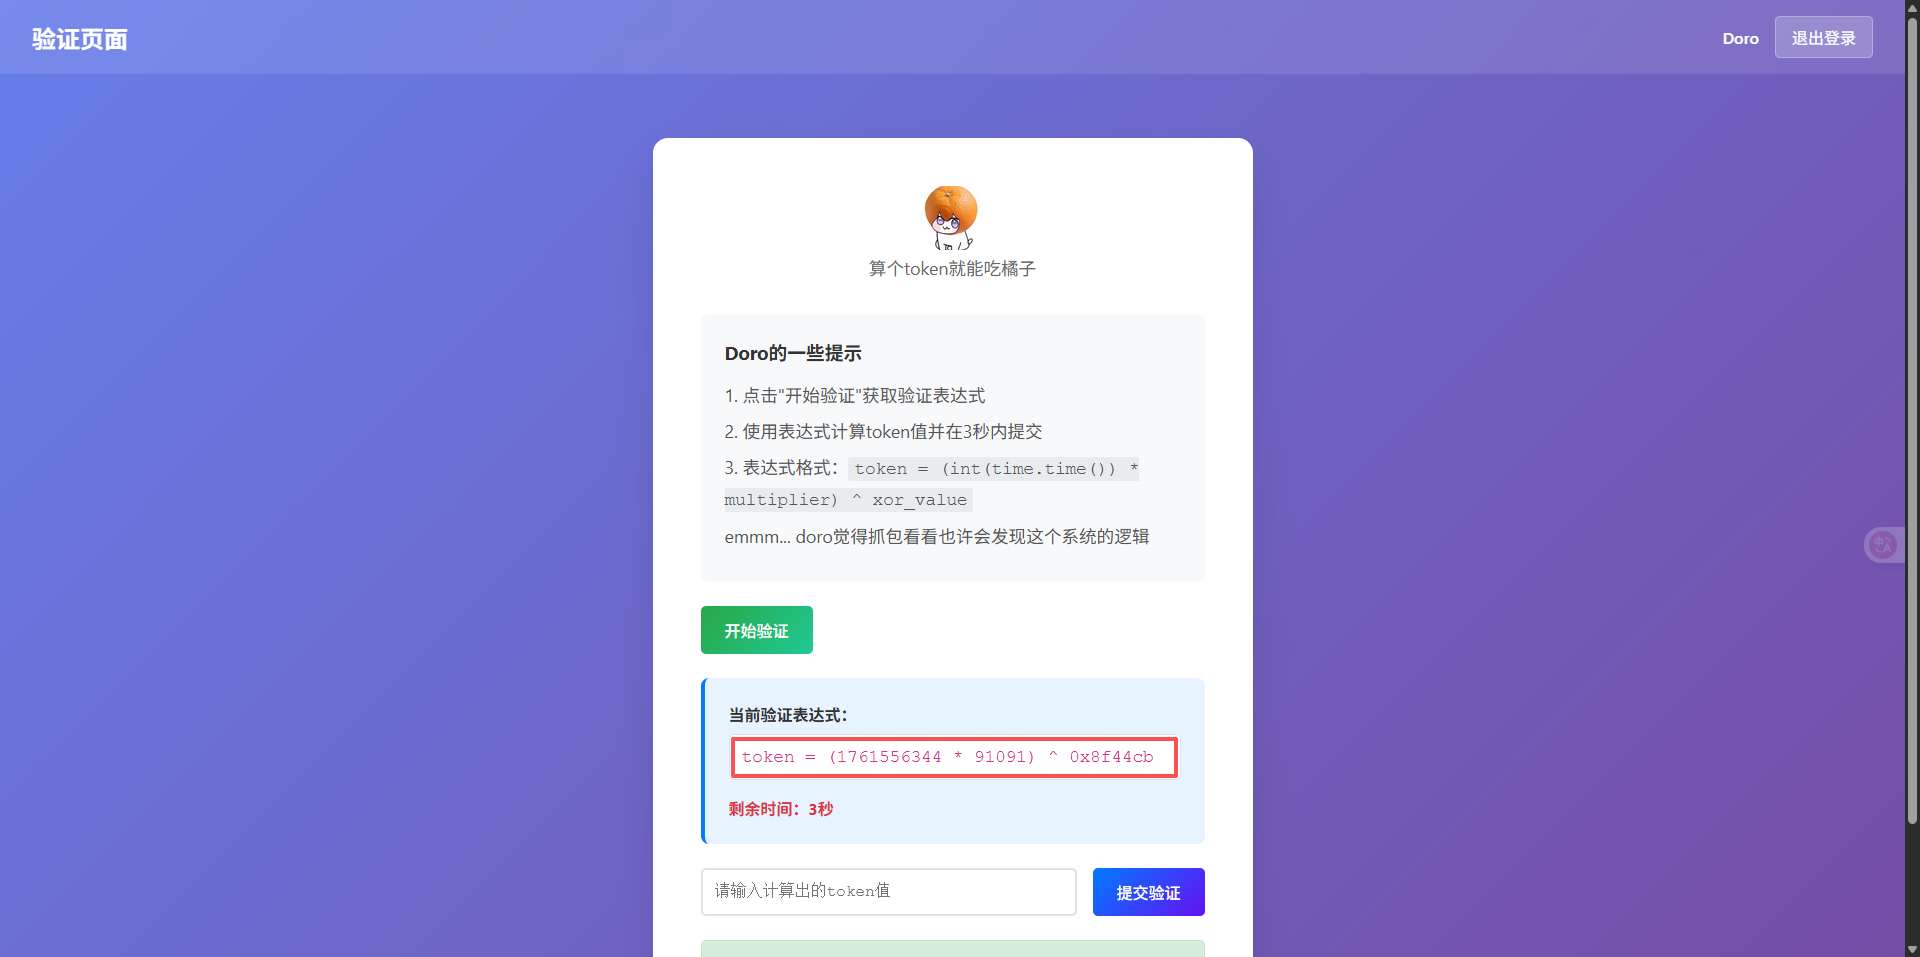
且每次 token 表达式是不一样的,显然 3s 内想要计算再填入验证框中是很困难的;届时如果能利用代码脚本帮助我们自动化整个过程,这一定是能够完成的。
在此之前,你需要了解 requests 模块 的基本用法,其主要用于发送 HTTP 请求,处理网络通信与 Web 服务器进行数据交互。
在我们的 web 网页中,一些动态数据是通过特定的路由来传递数据,我们需要清楚各个路由的作用,以此构建脚本内容,显然 Doro 给了我们提示。(从后面的解题情况来看,这个提示多此一举了)
编写解题脚本
假设你已经掌握了 Week1 学习的 HTTP 协议相关知识,那么服务器验证每个用户的登录凭据就是叫 Cookie🍪 的东西,我们抓个包来看看。
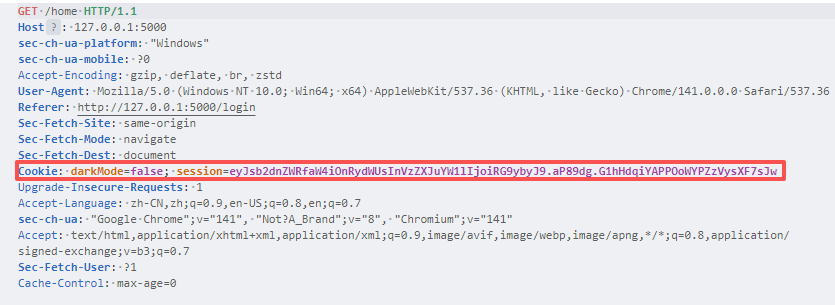
要想在请求 /home 路由后得到登录后的页面,你需要加上这个 Cookie
@app.route('/home')
def home():
    if 'logged_in' not in session or not session['logged_in']:
        flash('请先登录!', 'error')
        return redirect(url_for('login'))
可以看到后端代码会从你的 session 中检查 logged_in 字段
现在你想知道表达式的路由,点击开始验证后抓包
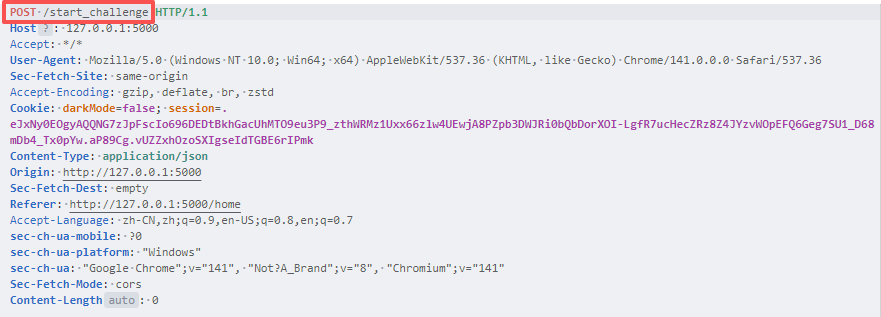
验证路由
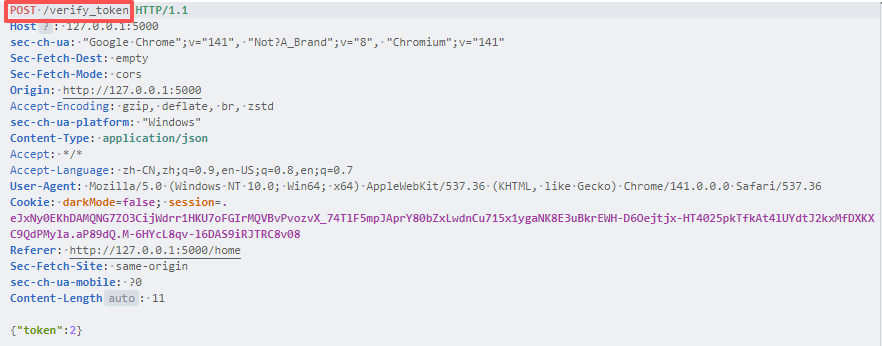
如果你尝试过直接通过路由传输数据,那么服务器会显示“未登录”,这是因为每个路由都经过鉴权处理,确保这些操作是授权了的
@app.route('/start_challenge', methods=['POST'])
def start_challenge():
    if 'logged_in' not in session or not session['logged_in']:
        return jsonify({'error': '请先登录'}), 401

@app.route('/verify_token', methods=['POST'])
def verify_token():
    if 'logged_in' not in session or not session['logged_in']:
        return jsonify({'error': '请先登录'}), 401
所以,现在你有一个构建脚本的清晰思路,拿到已登录的 Cookie,请求 /start_challenge 拿到数据,计算后,再将数据传递给 /verify_token 用于验证。
不过在这中间依旧有些细节需要我们注意

Content-Type: application/json:表示传输的数据格式是 JSON,从后面的相应也可以看出
Set-Cookie:用于在客户端(浏览器)设置 Cookie,通过提示可以发现设置的新 Cookie 里包含了以下这些参数,这是用于验证的,而我们需要从 json 中获取(\u 开头的字符串是 Unicode 编码)
因此我们提交数据时,记得带上这两个字段;现在打印这个相应可以看到
{
  "expression": "token = (1761560023 * 38196) ^ 0xfd1d72",
  "hint": "doro\u8bb0\u5f97\u8fd9\u91cc\u4f1a\u5728session\u91cc\u9762\u6dfb\u52a0\u9a8c\u8bc1\u53c2\u6570, \u4e5f\u8bb8Set-Cookie\u53ef\u4ee5\u5e2e\u52a9\u6211\u4eec......",
  "multiplier": 38196,
  "xor_value": "0xfd1d72"
}
time 时间戳是在表达式中的,我们需要提取出来,这里需要用到 正则表达式
INFO
简单来说,正则表达式可以匹配或者操作一段文本,通过特定的规则匹配我们想要处理或者过滤的字段,这在 CTF 的方方面面都会遇到
具体语法这里不过多赘述,简言之我们要获取 1761560023,这是数字字符,我们可以使用 \d+ 来匹配,这里我们只需要提取遇到的第一个数字即可,因此不需要贪婪模式匹配
time = re.search(r'\d+', expression).group()因此整体雏形大概是
import requests
import re

URL_start = 'http://localhost:5000/start_challenge'
URL_verify = 'http://localhost:5000/verify_token'
Cookie = 'session=eyJsb2dnZWRfaW4iOnRydWUsInVzZXJuYW1lIjoiRG9ybyJ9.aJBpgQ.3rK8tY4f360AArm8qXHD-dicCsU'

res_start = requests.post(url=URL_start, headers={'Content-Type': 'application/json', 'Cookie': Cookie})
new_cookie = res_start.headers['Set-Cookie']
multiplier = res_start.json()['multiplier']
xor_value = res_start.json()['xor_value']
expression = res_start.json()['expression']
time = re.search(r'\d+', expression).group()

result = (int(time) * multiplier) ^ int(xor_value, 16)

res_verify = requests.post(url=URL_verify, headers={'Content-Type': 'application/json', 'Cookie': new_cookie}, json={"token": result})
print(res_verify.text)
不过光是这样会返回

是的,依旧需要用到 Week1 学习的 HTTP 协议知识,看到这个提示,你应该想到 User-Agent
INFO
User-Agent 一般用于标识客户端类型,例如:浏览器类型(Chrome、Firefox、Safari 等)、操作系统(Windows、macOS、Linux 等)以及设备类型(桌面、移动设备等)。服务器根据 User-Agent 返回不同的内容,可以为移动设备返回移动版页面,或者为不同浏览器提供兼容性处理。如果我们不添加 UA 头,那么默认就是:

所以最终脚本如下:
import requests
import re

URL_start = 'http://localhost:5000/start_challenge'
URL_verify = 'http://localhost:5000/verify_token'
Cookie = 'session=eyJsb2dnZWRfaW4iOnRydWUsInVzZXJuYW1lIjoiRG9ybyJ9.aJBpgQ.3rK8tY4f360AArm8qXHD-dicCsU'
UA = 'Mozilla/5.0 (Windows NT 10.0; Win64; x64) AppleWebKit/537.36 (KHTML, like Gecko) Chrome/138.0.0.0 Safari/537.36'

res_start = requests.post(url=URL_start, headers={'Content-Type': 'application/json', 'Cookie': Cookie, 'User-Agent': UA})
new_cookie = res_start.headers['Set-Cookie']
multiplier = res_start.json()['multiplier']
xor_value = res_start.json()['xor_value']
expression = res_start.json()['expression']
time = re.search(r'\d+', expression).group()

result = (int(time) * multiplier) ^ int(xor_value, 16)

res_verify = requests.post(url=URL_verify, headers={'Content-Type': 'application/json', 'Cookie': new_cookie, 'User-Agent': UA}, json={"token": result})
print(res_verify.text)
事实上,你也可以使用 requests 库中的 Session 来进行管理会话,并且直接使用 eval 函数对相关表达式进行计算。
import requests

domain = "https://domain.com/"

url_login = domain + "login"
url_start = domain + "start_challenge"
url_verify = domain + "verify_token"

s = requests.Session()
s.headers.update({
    'User-Agent': 'Mozilla/5.0 (Windows NT 10.0; Win64; x64) AppleWebKit/537.36 (KHTML, like Gecko) Chrome/91.0.4472.124 Safari/537.36'
})

res_login = s.post(url=url_login, data={"username": "Doro", "password": "Doro_nJlPVs_@123"})

res_start = s.post(url=url_start)
expression = res_start.json().get('expression').split('=')[1].strip()
result = eval(expression)

res_verify = s.post(url=url_verify, json={"token": result})
print(res_verify.text)
以上脚本是一个从登录到攻击的全过程脚本,只需要更新 domain 的值即可自动获取 FLAG。